Intro to Interpreters
In the generators guide, we introduced the idea of integrating automated machine action with manual control through simple low-level SSL components [generators] that drive motion channels through velocity, position, and other signal types.
In this tutorial we will look at using [Interpreters] to generate motion signals for more complex pre-defined trajectories. We will also look at integrating complex preplanned motion and real time adjustment.
Concept
As discussed on the lecture on CNC control schemas traditional CNCs execute precompiled instructions generated on a desktop CAM program using an on-board interpreter. For 3D printers and CNC milling machines, these precompiled instructions are in the form of G-code.
For most plotters, like the Axidraw we are using, these instructions are in the form of scalable vector graphics (SVG). For a detailed breakdown of SVG structure for plotters see Golan Levin's Drawing With Machine's guide.
In a conventional plotting workflow, the operator creates or imports an SVG into a vector graphics software (InkScape), then using a plugin sends the SVG to the plotter to execute over serial. The Axidraw is controlled by an EiBotBoard which converts the incoming SVG data to step and direction operations for the Axidraw steppers, and up-and down movement for the pen servo, in a manner very similar to how GCode interpreters convert G-code to movement on a CNC machine.
Stepdance replaces the EiBotBoard on the Axidraw but can still interpret SVG files from Inkscape. We'll walk through how to set this up:
Setup
- Use the same hardware setup as the previous example (Axidraw + encoders + button + Stepdance board)
- Download and install Inkscape and the Axidraw extension for use in Thursday's class.
- Open the Arduino sketch
lib/examples/cmc_cours/02_intro_to_interpretersin Arduino IDE. This sketch starts up nearly identical to the code for the Step-a-sketch example, we will build on it to set up the interpreter.
Step 1 - Prepare your Interpreter in Stepdance
Interpreters are stepdance components that accept machine instructions for conventional CNC interpreters and convert them to Stepdance Motion Streams. Because we are going to plot SVGs with Inkscape, we will use the Eibotboard Interpreter, which can read instructions sent from the Inkscape Axidraw plugin in the same way the physical Eibotboard for a standard Axidraw functions. Rather than pass step and direction signals however, the Eibotboard Interpreter outputs motion streams that can be mapped to other Stepdance Components.
We start by declaring the Eibotboard generator object:
// -- AxiDraw Interface
Eibotboard ebb_interface;
Then, in the setup() method, we will configure the Eibotboard Interpreter. We don't need to do much setup since all of the parameters of operation are going to be controlled by what we draw in Inkscape. To connect it to the plotter's output, we map the output x, y, and z of the Eibotboard Interpreter to the axidraw kinematics x and y, and the z channel inputs respectively:
void setup() {
  //...

  // -- Configure and start EBB Interface --
  ebb_interface.begin();
  ebb_interface.output_x.map(&axidraw_kinematics.input_x);
  ebb_interface.output_y.map(&axidraw_kinematics.input_y);
  ebb_interface.output_z.map(&channel_z.input_target_position);

}
Optionally, we can add some functionality to make it easier to set up our system for plotting. We can add a second button and set it to a callback that lets us turn on and off the motors when pressed. This will let us move the axidraw x and y axis between plots back to a starting position without having to unplug the machine.
// -- Define Input Button --
//...

Button button_d2;

void setup() {
  //...

  button_d2.begin(IO_D2, INPUT_PULLDOWN);
  button_d2.set_mode(BUTTON_MODE_TOGGLE);
  button_d2.set_callback_on_press(&motors_enable);
  button_d2.set_callback_on_release(&motors_disable);
}


void motors_enable(){
  enable_drivers();
}

void motors_disable(){
  disable_drivers();
}
Upload the revised code to your board and keep your board plugged into your computer. If you don't have code with an Eibotboard Interpreter running, the next steps won't work!
Step 2 - Prepare Inkscape and Plot!
First we need to create or open a vector file in Inkscape that is feasible to plot. Inkscape can only be used to plot vector paths- fills and stroke weights are not registered as plotting information, nor is standard text. For more information on preparing vectors for plotting with Inkscape check out the Axidraw Wiki on this topic.
I'll plot an outline of some basic text as shown below:
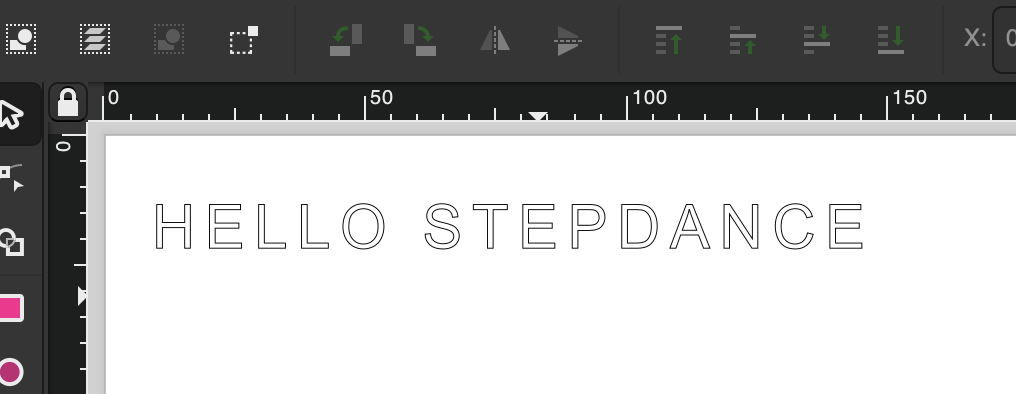
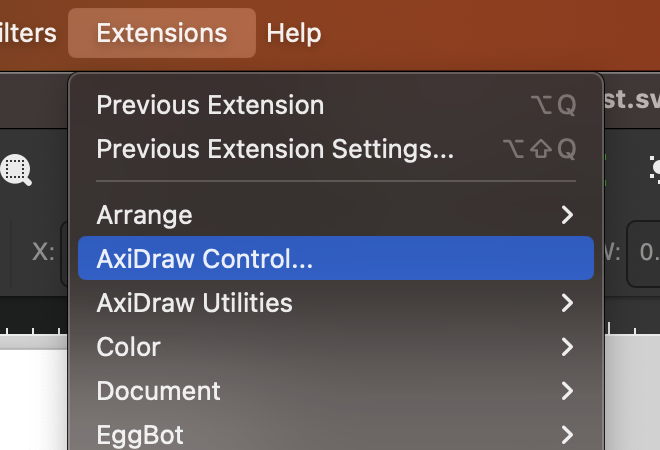
To control the plotter from Inkscape, you need to open up the Axidraw extension by selecting Extensions > Axidraw Control..
This will open a dialog box with different options for sending commands to the Axidraw.
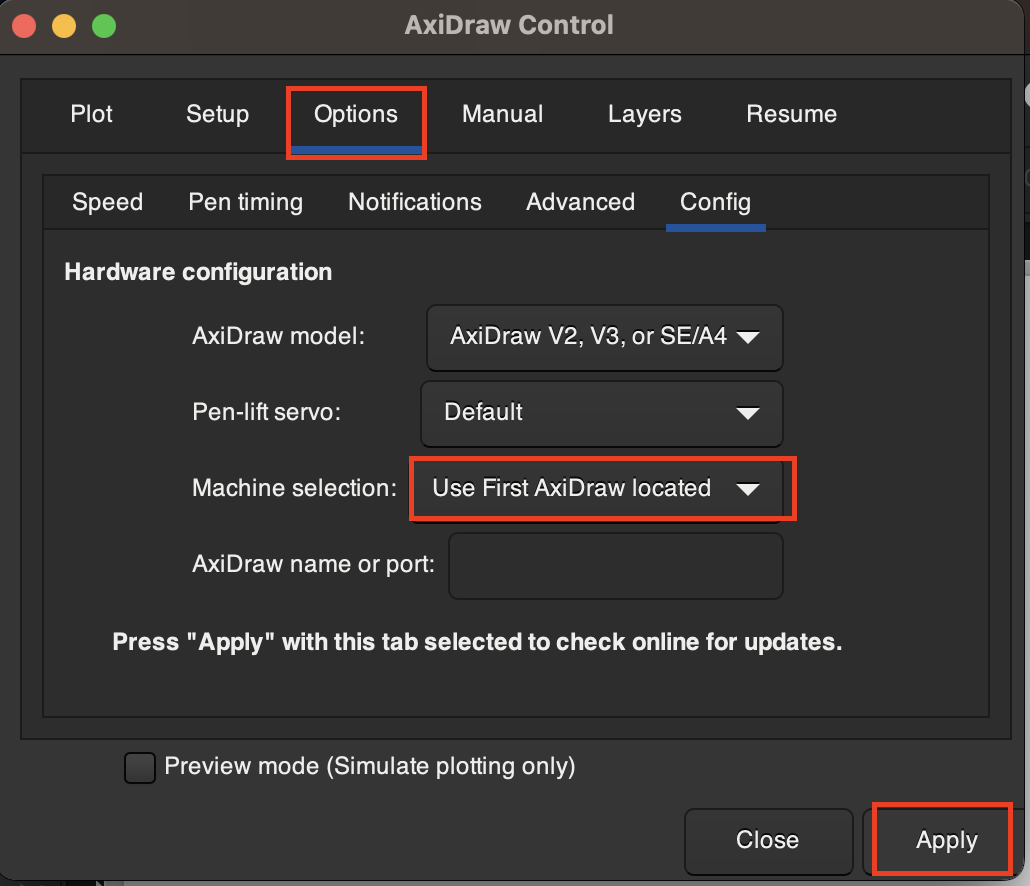
First, make sure that Inkscape can connect with your plotter. Select Options > Config and specify to Use First AxiDraw located to find the plotter. Click Apply. You should get a message that your Axidraw is connected. If the Axidraw fails to connect, make sure your serial monitor in the Arduino IDE is closed, and then unplug and plug your board back into your computer and try to connect again from Inkscape. Be sure to wait a few seconds after plugging your board in to connect.
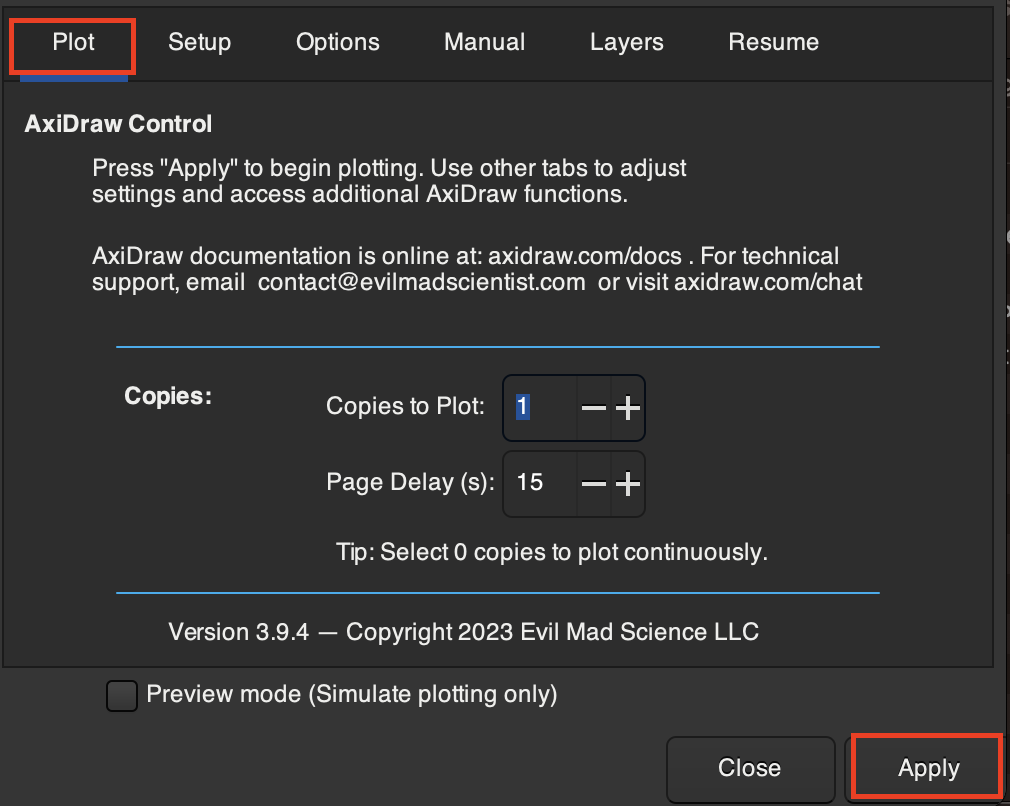
Then it's time to plot! Select the plot tab at the top of the control dialog. Before hitting Apply, make sure your axidraw machine is moved to a position that the plot will fit on- e.g. it won't crash because one or both of the motors is already at their limit. (The Axidraw starts plotting from wherever it is currently at, it won't home itself before begining). When you're ready, hit Apply to start plotting. If at any time you want it to stop, unplug your board, or press the button to disable the drivers.
Step 3 - Mix in Stepdance Components with Interpreter output
If you still have your encoder hooked up from the previous examples, try moving it while an Inkscape plot is running. What happens?
You can seamlessly mix inputs and mappings from other Stepdance components with Axidraw plotting. To see an example of this in action, open lib/examples/cmc_cours/02_intro_to_interpreters_finished in Arduino IDE. This is the same code as what you wrote previously, with the addition of a potentiometer controlling a ScalingFilter2D
Going further - GCode Interpreter
You can also interpret GCode -- See ScalingFilter2D