← Back to Schedule
Creative Motion Control Week 3: Integrating Manual and Automated Machine Operation
Date: Tuesday, April 14, 2026
Topics
Core Theme: Working on Project 1
- Rapid Prototyping Interfaces
Check in / Updates
- Project 1 working sessions All this week for both lab hours and regular class time, the focus is on working on and completing Project 1. If you feel you need additional time/ lab access, reach out to Jennifer on Discord. REMEMBER TO DOCUMENT REGULARLY THROUGHOUT THE PROCESS Your documentation is as important as the final machine and output.
- Project 1 Orders - Most materials are in but still waiting on sensors. If your project is dependent on a sensor, talk to Emilie about prototyping with a proxy sensor we have in our lab.
Activity 1 -- Overview on Interface Prototyping Methods
- Hands on tutorial for hooking up physical interfaces to Stepdance led by Alejandro. See additional links/guides in the resources below.
- Cardboard Prototyping There are cardboard boxes of various sizes under the Prusa 3D printer. There are also large cardboard sheets along the back wall by the door to the laser cutter and thin cardboard mats on the shelves on the other side of the door. All of this is available for hand cutting and assembly! (We will have the option of using the laser cutter for project 2).
- Electronic Components and Tools Electronic components and hand tools are located along the back wall and in the tall glass cabinet along the right hand side of the room when you enter. Components are either in red/ black bins or clear plastic drawers. Ask Ale and Emilie if you're looking for something specific. Please use what you need, and return things to the correct place when done!
Assignments
- Complete week 3 reflection by Monday 4/20 Noon. Reflection Slide
- Continue work on Project 1- Due Tuesday April 21st!
Resources and References
- Guide on coordinate systems in Stepdance. This Guide gives more insight into how coordinate systems work in Stepdance. The corresponding Arduino sketch also provides more hands-on examples of how to use the
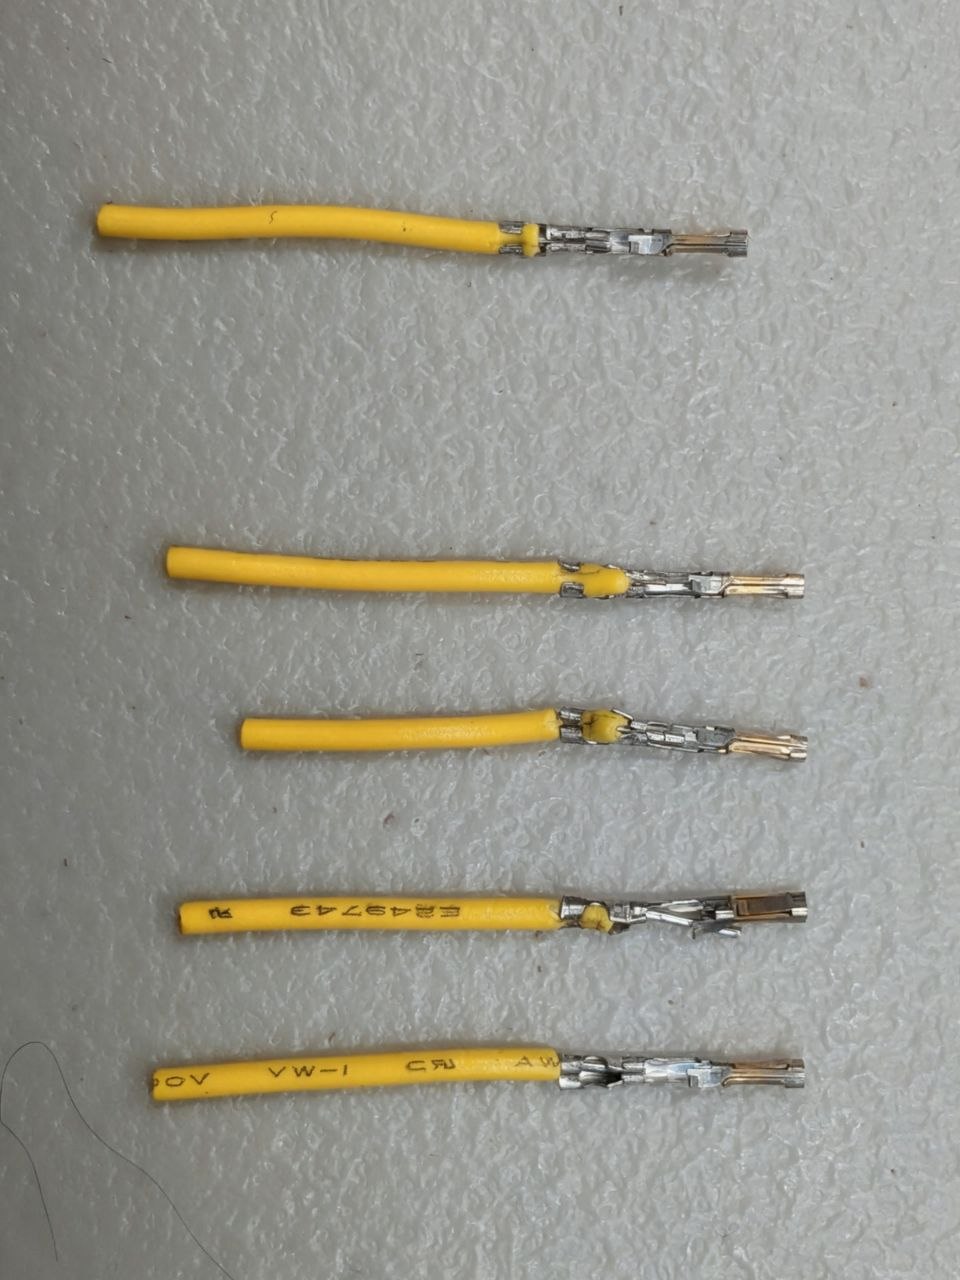
PositionGeneratorand theTimeBasedInterpolatorto send motion commands to reach absolute coordinate targets. - Instructable on Crimping Molex Connectors This Instructable uses slightly different molex connectors than what we use for the Stepdance board but the principle is the same!
- Sparkfun guide on splicing wires This Guide shows basic strategies for splicing wires. Reminder for heat gun- ONLY use this on heatshrink/ wires, NEVER on PCBs / electronic components.
This image demonstrates correct (top-most) and incorrect crimping:
Next Class
- Lab hours/ project work time!